Maple Candy Recipe: Delicious and Easy Snow Candy

Making Maple Sugar Candy is Easy
Maple sugar candy is easy enough for kids to make with supervision, makes great decorations for pies and cupcakes, and is a unique, great American treat.
Goodies made with real maple sugar and maple syrup are one of the things that make me happy. I grew up here in the midwest, where I can get fresh Maple syrup locally, and maple candy is something kids grow up enjoying.
Maple candy is an intensely flavored melt-in-your-mouth crystallized sugar treat that is wonderful anytime.

Maple candy is extremely easy to make, but it does require a few special tools, and precision. It can be shaped and molded any way you want, and is perfect if you want a variation on fondant. Ask the kids to help, it's fun and easy and the end product is delicious!
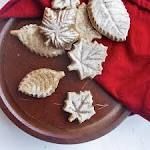
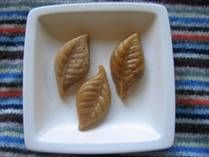
You can pour the maple candy into candy shaped molds, but they do not have to be molded. You can pour them onto a cookie sheet or pan lined with foil; you can cut it into squares, use cookie cutters, or drizzle it into any shape you like. You can even take it outside and pour it on fresh clean snow; kids LOVE to make snow candy!
Food coloring can be used to make maple candy colored. Use them to decorate cupcakes, cakes, pecan and pumpkin pies, or eat them on their own.
You must use 100% real maple syrup, because karo or "maple flavored" pancake syrups are not going to work. For intense maple flavor, use grade A or grade B dark amber real maple syrup.
Cook Time
Prep Time: 5 Minutes
Total Time: 15-20 Minutes
Ingredients
- 2 Cups 100% Maple Syrup Grade A or B
- 1 Tablespoon Unsalted Butter
- OPTIONAL: food coloring and/or pinch of pumpkin pie spice or similar spice mix
Instructions
- 1. Spray candy molds or cookie sheet/pan with nonstick cooking spray.
- 2. Pour the maple syrup into a heavy-bottomed medium saucepan. When maple syrup boils it gets big and bubbly, so if in doubt go with a bigger pan, you don't want it to boil over.
- 3. Insert candy thermometer and add butter. Stir.
- 4. Bring the syrup to 240 degrees, stirring occasionally.
- 5. Allow to cool for 2-3 minutes, then beat the syrup with a greased wooden spoon until it thickens, lightens in color and turns opaque. This takes 3-5 minutes. Stop stirring once it reaches this point, because you do not want it to set in the pan.
- 6. Spoon the thickened syrup into your molds, and smooth the tops. Alternatively, drizzle into desired shapes or pour out onto a cookie sheet or pan.
- 7. Allow to set for 5-7 minutes, then pop out of the molds or use cookie cutters.
Real Maple Syrup Doesn't Have to be Expensive
Real maple syrup can be a little expensive. I have learned to always check the gourmet foods aisle at discount stores like Marshall's, where I can usually find a few bottles of 100% maple syrup, sometimes the cute ones in maple leaf shaped bottles, quite inexpensively.
If you have access to sugar maple trees and live in the northeastern U.S., you may be able to tap and collect your own sap to boil down. It's easier than you think! There's a link below if you'd like to read more about it.
L.L. Bean gives card members points that can be used to buy their Maine maple syrup, and it's very tasty!
- Find a Marshall's near you.
The online Marshall's doesn't show that there is a food department, but there is :) - L.L. Bean Visa earns you rewards.
Use your rewards to buy yummy maple syrup. - How to make your own maple syrup.
From tapping the tree to your table.


